

Symptoms, Causes, and Replacement of a Bad Thermocouple in a Water Heater
Disclosure: As an Amazon Associate, I earn from qualifying purchases. Learn more
Symptoms of a bad thermocouple water heater include no hot water, a pilot light that won’t stay lit, and discoloration or damage to the thermocouple. A water heater thermocouple can go bad due to contamination, clogging, or wear and tear. To address this, clean or replace the thermocouple.
A water heater thermocouple is a safety device that plays a vital role in the operation of your water heater. It senses the pilot light’s heat and controls the burner’s gas flow. When this component fails, it can cause a range of issues. The most noticeable symptom is the absence of hot water. This occurs when the pilot light fails to stay lit, a direct result of a malfunctioning thermocouple.
The thermocouple can also exhibit signs of physical damage. Visible contamination on the tube, such as discoloration, cracks, or pinholes, indicates deterioration. These defects can compromise the device’s ability to function correctly. Regular cleaning is essential as thermocouples can get clogged, especially without routine maintenance.
Another sign of a failing thermocouple is a pilot light that appears small and has an orange-yellow tinge. This indicates a weak flame that is insufficient to heat the thermocouple adequately.
In terms of solutions, cleaning the thermocouple can sometimes restore its functionality. However, if the damage is significant, replacement is necessary.
The cost of repair or replacement typically ranges from $150 to $250. It’s also possible to use a universal thermocouple for water heater repairs. Conducting a thermocouple test can help diagnose the issue, and for more complex systems like furnaces, similar symptoms may suggest a bad thermocouple.
Symptoms of a Bad Thermocouple Water Heater and What to Do Next
A bad thermocouple in a water heater can manifest in various ways, each indicating a specific problem within the system. Understanding these symptoms and their corresponding solutions is essential for maintaining a safe and efficient water heater.
1. No Hot Water
When a thermocouple fails, the most immediate and noticeable symptom is the absence of hot water. This occurs because the thermocouple’s role is to sense the heat from the pilot light and, in turn, control the gas flow to the burner.
If the thermocouple is not working correctly, it fails to detect the pilot light’s heat, causing the gas valve to close. This safety mechanism prevents gas from flowing when there is no flame to burn it, avoiding potential gas leaks. However, it also means no gas reaches the burner, so the water remains cold.
Solution: To address this issue, first inspect the pilot light. If the pilot light is out, relighting it may solve the problem. However, if the pilot light won’t stay lit or there is no issue with the pilot light, the thermocouple might need cleaning or replacing.
A professional can test the thermocouple with a multimeter to determine if it is faulty and needs replacement.
2. Pilot Light Won’t Stay Lit
A common symptom of a faulty thermocouple is a pilot light that frequently goes out. The thermocouple and pilot light work in tandem; if the thermocouple is malfunctioning, it may incorrectly sense that the pilot light is off and shut down the gas supply, causing the pilot light to extinguish.
Solution: Cleaning the thermocouple can sometimes resolve this issue. Dirt and debris can block the thermocouple, preventing it from accurately detecting the pilot light.
If cleaning does not fix the problem, replacement of the thermocouple is necessary. It’s crucial to choose the right type of thermocouple for your water heater model. A professional can ensure the correct part is used and properly installed.
3. Visible Signs of Wear and Tear
Physical signs of deterioration on the thermocouple, such as cracks, corrosion, or discoloration, are clear indicators of a problem. These signs suggest the thermocouple has been subjected to prolonged use and has begun to wear out.
Corrosion can be particularly problematic as it can interfere with the thermocouple’s ability to conduct electrical signals properly.
Solution: In cases where physical damage is visible on the thermocouple, the best course of action is to replace it. Continuing to use a damaged thermocouple can lead to safety hazards, including the risk of gas leaks if the pilot light goes out unnoticed.
A new thermocouple ensures that the water heater operates safely and efficiently.
Related: What Happens If the Water Heater Pilot Light Goes Out?
Water Heater Thermocouples and Their Operation
A water heater thermocouple is a safety device found in gas water heaters. It consists of a metal rod that is exposed to the flame of the pilot light and is connected to the gas control valve.
The primary function of a thermocouple is to detect whether the pilot light is lit. When the pilot light is on, the thermocouple senses the heat and generates a small electrical current, keeping the gas valve open.
If the pilot light goes out, the thermocouple cools down, the current stops and the gas valve closes. This prevents gas from leaking into your home.
This component is crucial because it ensures that gas is not released unless there is a flame present to burn it, thereby preventing dangerous gas buildups.
Causes of Thermocouple Failure
Wear and Tear Over Time
Continuous exposure to heat and flame can cause the thermocouple to degrade. Over time, this can lead to a reduction in the thermocouple’s ability to generate the necessary electrical current.
Buildup of Dirt and Debris
The accumulation of dirt and debris can insulate the thermocouple, affecting its ability to sense heat accurately. This can cause it to falsely detect a cold pilot light and shut off the gas supply.
Corrosion
Exposure to moisture and other elements can lead to corrosion of the thermocouple, impairing its functionality and the electrical connection it provides.
Operational Fatigue
Continuous heating and cooling cycles can weaken the thermocouple over time, reducing its efficiency and lifespan.
Testing a Water Heater Thermocouple
To test a water heater thermocouple, you’ll need a multimeter set to measure millivolts.
First, ensure the pilot light is lit and the thermocouple is heated. Connect the multimeter leads to the thermocouple: one to the copper lead and the other to the tube where it connects to the gas valve.
A properly functioning thermocouple should show a reading between 20 and 30 millivolts.
Lower readings indicate a failing thermocouple, and it may need replacement to ensure the water heater operates safely and efficiently.
Cleaning a Water Heater Thermocouple
Step 1
Turn off the Gas Supply. Before starting, ensure the gas supply to the water heater is completely shut off for safety.
Step 2
Locate and Access the Thermocouple. Identify the thermocouple, which is typically located near the pilot light.
Step 3
Gently Clean the Thermocouple. Using a piece of fine sandpaper or steel wool, gently clean the thermocouple’s surface to remove any dirt or buildup.
Step 4
Reassemble and Test. After cleaning, reassemble any removed parts and turn on the gas supply. Light the pilot light and observe if the thermocouple is functioning correctly.
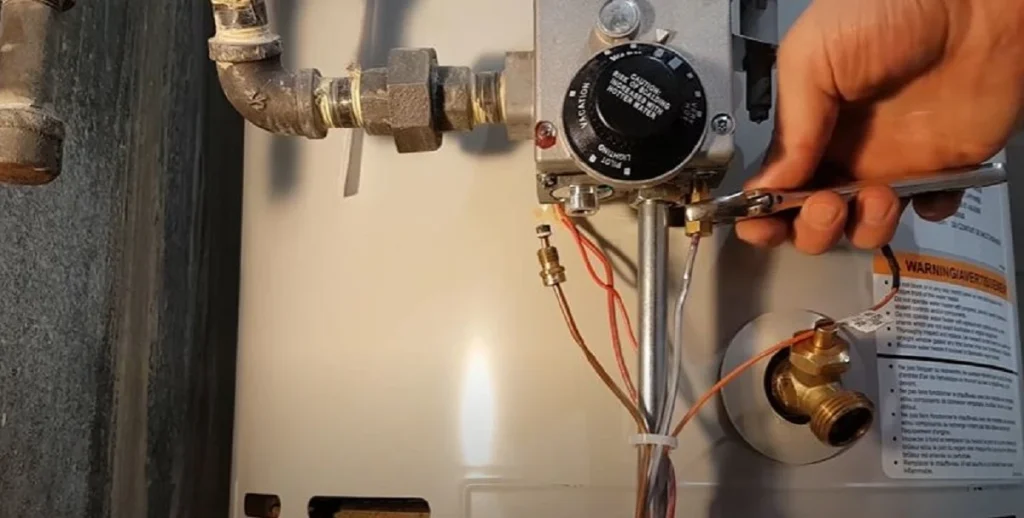
Thermocouple Water Heater Replacement
Replacing a thermocouple in a water heater is a task that can be undertaken with some basic understanding of the appliance and a careful approach. This process involves several steps to ensure the new thermocouple is installed correctly, ensuring the safe and efficient operation of your water heater.

Step 1: Turn Off the Gas and Power
Safety is paramount. Before beginning, turn off the gas supply to the water heater. This is usually done by turning the gas valve to the ‘off’ position. If your water heater is electrically powered for control systems, ensure it is unplugged or the power supply is cut off.
Step 2: Access the Burner Assembly
Remove the outer access cover of the water heater to reveal the burner assembly. This may require unscrewing or simply lifting off, depending on the model of your water heater.
Step 3: Remove the Old Thermocouple
The thermocouple is typically connected to the control valve and the burner assembly. Gently unscrew or unfasten it from these points. Care should be taken not to apply too much force, as this could damage the gas control valve or the burner.
Step 4: Position the New Thermocouple
Place the new thermocouple in the same position as the old one. Ensure that the probe end of the thermocouple is properly positioned in the pilot flame. Incorrect positioning can result in the thermocouple not sensing the flame correctly.
Step 5: Secure the New Thermocouple
Attach the new thermocouple to the control valve and burner assembly. Ensure all connections are secure but do not overtighten, as this can strip the threads or damage the components.
Step 6: Test the Installation
Once the new thermocouple is installed, turn the gas supply back on and relight the pilot light according to the manufacturer’s instructions. Observe the pilot light for a few minutes to ensure it stays lit, indicating that the thermocouple is functioning correctly.
Replacing a thermocouple is generally a straightforward process, but attention to detail is essential for ensuring a safe and effective repair. If there are any uncertainties or complications during the replacement, seeking professional assistance is advisable.