Yes, you can clean a dryer vent yourself with basic tools and proper steps. Many homeowners handle this task to save money and maintain dryer efficiency.
Cleaning a dryer vent is straightforward if you follow the right steps. Start by unplugging the dryer and pulling it away from the wall. Disconnect the vent hose and use a vacuum or brush to remove lint from the interior vent opening. For the exterior vent, go outside and detach the cover. A leaf blower can be effective for blowing out stubborn lint from the duct. Attach the blower to the interior vent opening and let it push debris outside.
How often should you clean out dryer vents depends on usage. For most households, once a year is sufficient. If you dry clothes frequently or have a large family, consider cleaning every six months. A clogged vent reduces efficiency, increases drying time, and poses a fire hazard.
If cleaning from the outside, remove the vent cover and use a flexible brush or leaf blower to clear the duct. This method works well if moving the dryer is difficult. Always check the entire vent path for blockages, especially bends where lint accumulates.
While DIY cleaning is possible, some situations need professional help. If the vent is long, has multiple bends, or shows signs of damage, hiring an expert ensures thorough cleaning. Regular cleaning keeps your dryer running smoothly and extends its lifespan.
For best results, inspect the vent periodically and clear lint after every few loads. Simple maintenance prevents costly repairs and keeps your home safe.
Why Cleaning Your Dryer Vent Is Necessary
A clogged dryer vent is more than just an inconvenience—it poses serious risks. Lint buildup restricts airflow, forcing your dryer to work harder and increasing energy bills. Over time, excess heat from poor ventilation can damage internal components, shortening the appliance’s lifespan.
The biggest danger is fire hazards. Lint is highly flammable, and trapped heat can ignite it. The National Fire Protection Association reports thousands of home fires annually due to neglected dryer vents. Proper cleaning reduces this risk significantly.
Efficiency also improves with a clean vent. Clothes dry faster, and the machine runs smoother. Reduced strain on the motor means fewer repairs. Regular maintenance keeps your laundry routine safe, cost-effective, and hassle-free.
Step-by-Step DIY Dryer Vent Cleaning
Gather the necessary tools before starting: a vent brush kit, vacuum with hose attachment, screwdriver, and flashlight. Proper preparation ensures a smooth and effective cleaning process.
Step 1: Unplug the Dryer
Safety comes first. Disconnect the dryer from the power source to eliminate any risk of electrical shock. Move the dryer away from the wall to access the vent easily.
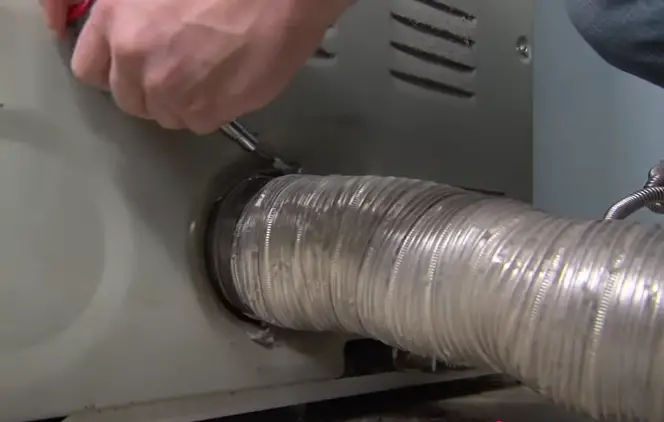
Step 2: Detach the Vent Hose
Loosen the clamp or duct tape securing the vent hose to the dryer. Carefully pull the hose away to expose the vent opening. Inspect for visible lint buildup around the connection point.
Step 3: Clean the Interior Vent Opening
Use a vacuum hose to remove loose lint from the dryer’s exhaust port. Follow up with a vent brush to dislodge stubborn debris. Push the brush deep into the duct and rotate to scrub the interior walls.
Step 4: Clear the Vent Hose
Check the hose for blockages. If flexible, straighten it and run the brush through. For rigid metal ducts, use the vacuum to suction out lint. Replace damaged hoses to maintain proper airflow.
Step 5: Clean the Exterior Vent
Locate the outdoor vent cover and remove it with a screwdriver. Insert the brush or vacuum to clear lint from the exterior opening. Ensure the flap moves freely to prevent obstructions.
Step 6: Reassemble and Test
Reconnect the vent hose securely, using new clamps or tape if needed. Plug the dryer back in and run a test cycle. Check for improved airflow and listen for unusual noises.
Step 7: Regular Maintenance Tips
Make a habit of checking the lint trap after each load. Schedule deep cleanings annually or more often if drying performance declines. Consistent care keeps the system running efficiently.
How to Clean a Dryer Vent from the Outside
Start by locating the exterior vent cover, usually on the side of the house. Remove the cover using a screwdriver. Inspect the opening for visible lint or debris.
Insert a vent brush or vacuum hose to pull out loose lint. For deeper cleaning, attach a leaf blower to the interior vent opening and let it push trapped debris outside. This method clears stubborn buildup without disassembling the entire duct.
Reattach the cover securely to prevent pests or weather damage. Checking the exterior vent regularly keeps airflow optimal and reduces fire risks.
Learn More: Is It Safe to Vent an Electric Dryer Inside?
Using a Leaf Blower to Clean Your Dryer Vent (Quick Method)
A leaf blower offers a fast, powerful way to clear lint. Disconnect the dryer from the vent hose indoors. Seal any gaps around the hose with tape to maximize airflow.
Attach the leaf blower to the vent opening and turn it on. The strong blast forces lint out through the exterior vent. This method works best for moderately clogged ducts but may not remove packed buildup.
For best results, combine this with manual brushing. The leaf blower technique is ideal for quick maintenance between deep cleanings.
- Read More: Is a Gas Dryer the Right Choice?
How Often Should You Clean Your Dryer Vent?
Frequency depends on usage.
1. Average households should clean vents at least once a year.
2. Large families or heavy users may need cleaning every six months.
Warning signs include longer drying times, overheating, or a burning smell. Ignoring these signals increases fire risks and energy waste. Setting a reminder ensures timely maintenance.
DIY vs. Professional Dryer Vent Cleaning: When to Call an Expert
DIY cleaning works for simple, short vents. If your system has multiple bends, long ducts, or persistent blockages, professionals have specialized tools for thorough cleaning.
Hiring an expert ensures safety and efficiency. They can also inspect for damage, such as crushed pipes or bird nests. For complex setups, professional service is a smart investment.